So we had decided to have a couple of nights in Daisy Cottage before Christmas and set off after lunch yesterday. Driving along we were chatting about what we would do once in Dunkineely: have a couple of meals out at any of the great restaurants we love there, maybe have a nightcap (or three!) in Mac's Bar beside Daisy Cottage and of course get out and about with our cameras.
 |
| Snowy Donegal! |
However all our plans were dashed a few miles out of Letterkenny when we came upon dreadful weather! To continue or to return home, that was the question: We could have continued but for two factors, I was a bit worried about going through Barnesmore Gap in such conditions; and two, Christmas Day is fast approaching and we didn't want to miss Christmas Day with our family.
So we turned around and came home. Naturally we were disappointed but as I had nothing else planned I decided I would try making the home made candles I had planned to make after seeing Kirsty Allsop make them on one of her Christmas shows recently.
I searched the charity shops for an antique/vintage cup and saucer but not one of them had any! I have vintage tea sets but of course didn't want to break up a tea set for one cup and saucer. We were in Dunnes Stores getting some messages when I spotted a cute little cup and saucer that I knew would do the job perfectly.
 |
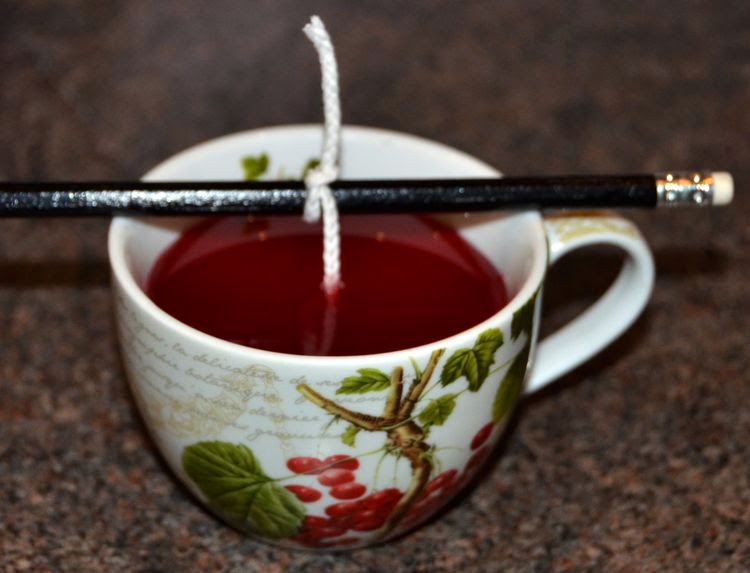
| My first home made candle! |
I have been intending to make candles for ages and so have been gathering up used candles so I would have the wax. These big fat candles we buy tend to become useless after a few uses and we are left with a big candle that no longer does what it should. But this is good because it saves having to buy wax.
I had already bought wick and little wicks with the metal on the end (like the ones you get in tea lights but with a slightly longer wick). I also chose some red wax dye, being Christmas and all that. I tried to do the candle using the little wicks with the metal on the end and carefully suck the metal to the base of my cup with sticky tack as advised by our local craft shop owner. I did as she advised and added a little of my melted candle wax to the bottom of the cup and allowed it to set. All well and good so far.

But that was as good as it got! When the base wax had set I slowly added more wax to top it up to the desired level and the wick went all silly on me. I tried holding the end of it but honestly I would have had to stand there until the cup full of wax set and I had no intention of doing that! That idea was scrapped and I cleaned my effort out of the cup and started again with the length of wick I had bought and then things sailed along perfectly.
Before I list my How To here I would just point out that the little wicks with metal on the end worked out for me today making tiny candles (I attached the top of the wick to a pencil above the glass with a bit of sticky tack). Clearly they don't work as well in a bigger container like my cup.
So, here it is: How to make a home made candle:
Before we begin, and this is VERY IMPORTANT: DO NOT HEAT THE WAX IN A SAUCEPAN OR IN A MICROWAVE. The wax heats and does not throw out smoke as oil would and so it may overheat and explode into a blaze causing dreadful damage.
UTENSILS
~ A medium sized saucepan
~ A heatproof bowl that will sit on the top of the saucepan
~ A large metal spoon
~ A heatproof jug
~ Candle wax or an old candle
~ Candle wax dye if using
~ Wick
~ Sharp scissors
~ Sharp (small) knife
~ A pencil (preferable with ridges so that it doesn't move about on candle vessel. If you haven't one a bit of sticky tack will hold a smooth pencil in place)
~ A utensil to set the candle in or a dish or cup and saucer if desired
METHOD

1. Put boiling water in the saucepan and set the heatproof dish on the top of it (make sure it is not touching the water).
2. Switch on the ring on the cooker below the saucepan to a low setting and allow the wax/candle to melt in the bowl. (I put the whole candle in but you can chop up your old candle and put the bits in). By the way, if you are using an old candle cut the used (black) wick right in as far as you can before putting into the bowl so that you don't get black bits in the wax.
3. While the wax is melting get your candle container ready. Drop your wick into the cup and allow extra so that you can tie it onto the pencil still allowing the wick to go all the way down to the bottom of the cup. Centre it above the cup as I have done in the picture to the left here.
4. Keep an eye on the bowl and pan until the wax has melted. Add the wax dye if using and stir in. You don't need a lot of the wax dye and I just shaved bits of the block of it I had bought with a sharp knife and stopped when I had reached the shade I wanted.
5. Scoop some of the hot wax into your small heatproof jug and carefully pour into the cup to nearly the top making sure you have enough room between the top of the wax and the knot in the wick (remember you will have to have enough wick to light once the knot is cut).
6. Retain some of the hot wax in your bowl as when the wax in the cup sets, there will be a slight dip in the middle you will need to fill when it is set.
It will set in a couple of hours.
7. Once set, gently pull the pencil from the knot of wick. Hold the loop and cut just beneath it with sharp scissors.
Not too difficult at all eh? Mind you, the MESS
I made!


 1. Put boiling water in the saucepan and set the heatproof dish on the top of it (make sure it is not touching the water).


No comments:
Post a Comment